緣由
發文或登入時阻擋機器人 (bot)
版本
v3:分數驗證 (Google 會回覆 0~1 之間的分數)
v2:問題驗證 (要回答 Google 問的圖形之類的問題)
(1) checkbox:勾選 “我不是機器人” 來驗證要求
(2) invisible:藏在背景,有疑慮才需驗證
備註:目前 ios 只支援 v2 invisible
步驟
申請 reCaptcha key
這裡以 v2 checkbox 為例
先到 這裏 申請
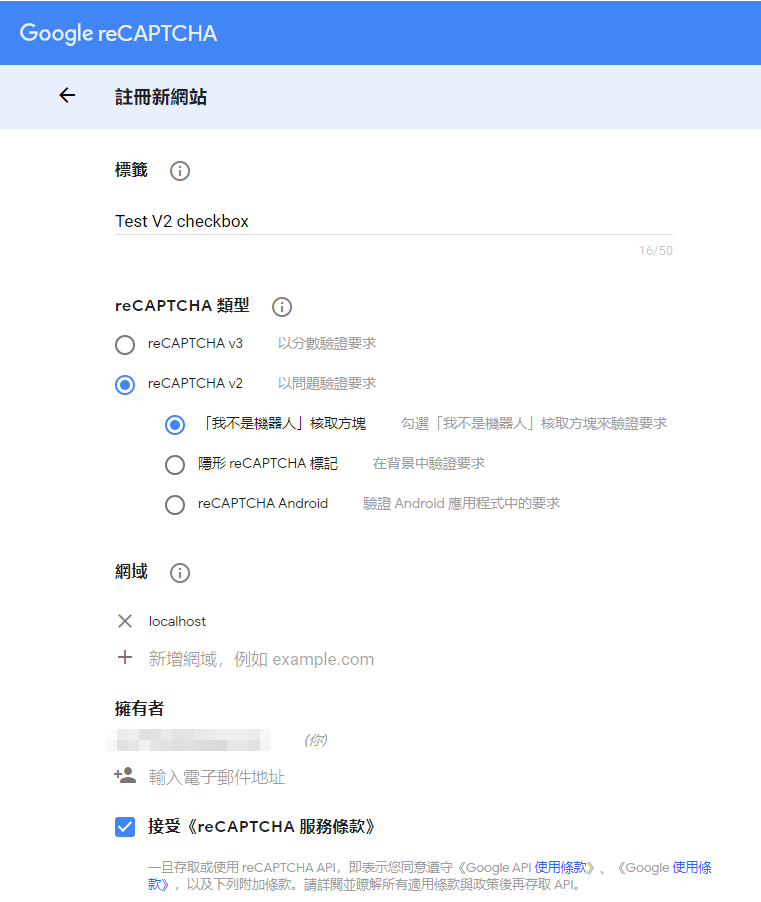
介面如下:

標籤填名稱
類型勾選 “v2” -> “我不是機器人核取方塊”
網域填寫網址或是 app 的 package name,如果是本地端測試也要填個 localhost 與 127.0.0.1
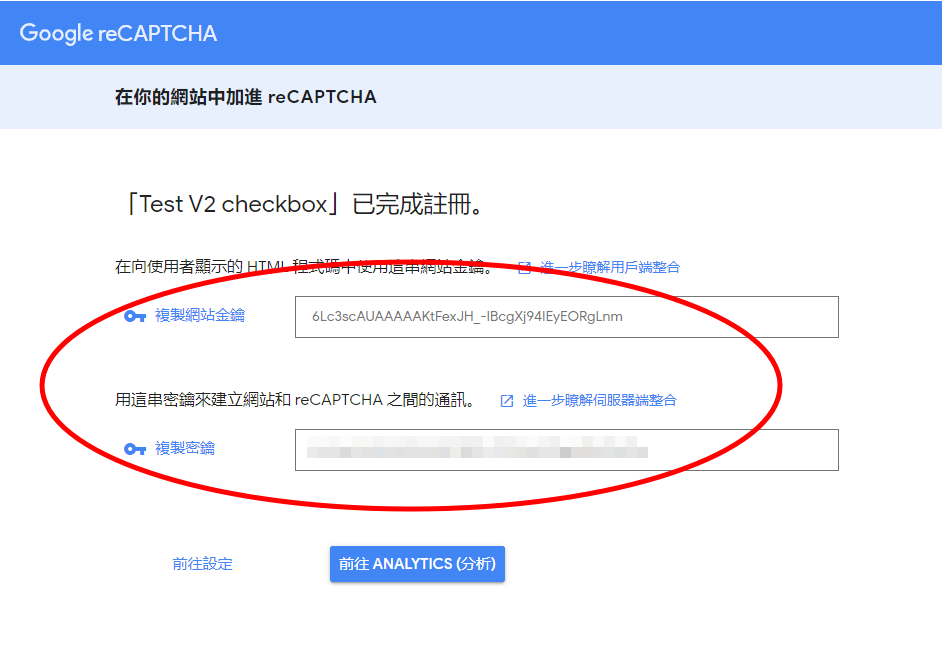
複製 key
網站金鑰 (site key) 是前端用
密鑰 (secret) 則是後端用 (請保存好,小心外洩)

前端範例
以金鑰 = 6Lc3scAUAAAAAKtFexJH_-IBcgXj94IEyEORgLnm 為例
client.html 範例
在這邊模擬一個登入畫面
第 14 行;html 內放一個 hidden tag recaptcha-token 來存 token
第 17 行;html 內放一個 div tag recaptcha 來放 checkbox
第 19 ~ 20 行;底下再 load https://www.google.com/recaptcha/api.js 與 ./recaptcha.js
1
2
3
4
5
6
7
8
9
10
11
12
13
14
15
16
17
18
19
20
21
22
23
| <!DOCTYPE html>
<html lang="en">
<head>
<title>reCAPTCHA V2 checkbox Test</title>
</head>
<body>
<form id="myForm" action="http://localhost:7777/login" method="post">
<label for="account">Account:</label>
<input name="account" required><br />
<label for="password">Password:</label>
<input name="password" type="password" required><br />
<input id="recaptcha-token" name="token" type="hidden" value="">
<button>登入</button>
</form>
<div id="recaptcha"></div>
<script src="https://www.google.com/recaptcha/api.js?onload=onloadCallback&render=explicit" async defer></script>
<script src="./recaptcha.js"></script>
</body>
</html>
|
recaptcha.js 範例
第 9 ~ 13 行;recaptcha 功能綁定到 recaptcha div 上
第 16 ~ 18 行;render 的 callback 把拿到的 token 存回 recaptcha-token 內
之後就能利用 form post 把 account、password、token 一起傳給後端
1
2
3
4
5
6
7
8
9
10
11
12
13
14
15
16
17
18
| const myForm = document.getElementById("myForm");
const recaptcha = document.querySelector("#recaptcha");
const recaptchaToken = document.querySelector("#recaptcha-token");
const siteKey = "6Lc3scAUAAAAAKtFexJH_-IBcgXj94IEyEORgLnm";
function onloadCallback() {
window.grecaptcha.render(recaptcha, {
sitekey: siteKey,
size: "checkbox",
callback: updateToken
});
}
function updateToken(token) {
recaptchaToken.value = token;
}
|
Android 範例
請參考 這裏
iOS 範例
請參考 這裏
後端範例
這邊使用 express 來開一個後端 Server,axios 來發 request
要特別注意的是 siteverify API 雖然 method 是 POST
但只能用 querystring 來傳遞額外參數
第 12 行;接收 token 等參數
第 18 行;把 __your_secret__ 替換成申請的密鑰
第 15 ~ 21 行;把 secret、token 當參數 request siteverify API
第 22 ~ 31 行;收到 siteverify API 的 Response,如果 success 是 true,代表驗證成功,第 24 行以後可作後續的 login 行為
1
2
3
4
5
6
7
8
9
10
11
12
13
14
15
16
17
18
19
20
21
22
23
24
25
26
27
28
29
30
31
32
33
34
35
| const axios = require("axios");
const express = require("express");
const bodyParser = require("body-parser");
const querystring = require("querystring");
const app = express();
app.use(bodyParser.urlencoded({ extended: false }));
app.use(bodyParser.json());
app.post("/login", async (req, res) => {
const { account, password, token } = req.body;
const { status, result } = await axios
.post(
"https://www.google.com/recaptcha/api/siteverify",
querystring.stringify({
secret: "__your_secret__",
response: token
})
)
.then(result => {
const { success, "error-codes": errorCode } = result.data;
if (success === true) {
return { status: 200, result: { msg: "Success" } };
} else {
return { status: 404, result: { errorCode } };
}
});
res.status(status).json(result);
});
app.listen(7777);
|
成品畫面
如有設定成功的話會如以下畫面:

備註:如果 “我不是機器人” 區塊沒出來的話可去 控制台 確認有沒有把網域加進去
Error Code
如果 response 內的 success === false 時
error-codes 會有錯誤訊息的 code
詳細可參考 這裡
資料來源
- Developer’s Guide
- reCAPTCHA v2 Invisible,不用再把「我不是機器人」列入頁面設計考量
- reCaptcha Form with an Amazon AWS™ serverless backend environment
- How to Setup a Serverless Contact Form with AWS Lambda, reCAPTCHA and Storyblok
- 簡介:給人類方便給bot困難
- 如何整合“No CAPTCHA reCAPTCHA”(驗證碼)到你的網站裡


Comments